Language of Guideline: Bi-language (English & Mandarin)
Bloggers who have just registered themselves with Nuffnang, you yourself are called Nuffnangers. =)
剛與Nuffnang申請為會員的博客們,你們有一個通用稱呼,叫Nuffnangers。
Disclaimer: We are not acting on behalf on Nuffnang to provide these guidelines on the internet and our guideline provided is solely based on our experience and with the aid of instructions posted on Nuffnang.com. Although the below guideline has been tested and proved to be work, we disclaim 100% accuracy on the guideline as every computer has its own situation. We welcome any feedback from you, in any form available to you.
First of all, there are 3 types of ads units that are available for all bloggers to place in different parts of their blog. There are Header (Leaderboard), Sidebar (Skyscrapper) & Between contents (Large Rectangle).
首先,那裡有三種不同的廣告單位提供給所有博客以便放在你們部落格裡不同的位置上。那三種廣告單位是:Header (Leaderboard), Sidebar (Skyscrapper) & Between contents (Large Rectangle)。
Please do ensure that you've added your blog address in Blog Manager first.
請確保你先在Blog Manager註冊你的部落格。
Step 1: / 步驟一: Login to Blogger & Go to "Design" / 登錄Blogger及前進“Design”
First step to start placing your ads units. Login to your Blogger account and click on the "Design" button in your dashboard. You will be in your dashboard just after you've logged into your account.
第一個步驟就是先登錄自己的Blogger戶口然後在儀表板或者是dashboard裡按設計或者是"Design"這個扭。當你一登錄你的戶口,你就會在你戶口的儀表板了。
 |
| Step 1: Login to Blogger Account & Go to Design |
Steps 2 to 4 are for Header (Leaderboard) & Between contents (Large Rectangle).
步驟二至步驟四是用於Header (Leaderboard) & Between contents (Large Rectangle)。
Step 2: / 步驟二: Go to "Edit HTML" and Tick "Expand Widget Templates" / 前進“Edit HTML”及將"Expand Widget Templates"旁的格子打勾
Under the "Design" tab, click on "Edit HTML" and when it comes to "Edit HTML" tick the box beside the "Expand Widget Templates".
在"Design"之下,按"Edit HTML"然後把"Expand Widget Template"旁的格子給打勾。
 |
| Step 2: Tick Expand Widget Template |
Step 3: / 步驟三: Adding Leaderboard Unit / 加入Leaderboard單位
Click "Ctrl+F" and type "<body" to get to the line highlighted in the diagram. Insert the code provided from Nuffnang after the highlighted line as shown in the diagram.
在界面按"Ctrl+F"然後輸入"<body"以便尋到畫面裡的那行字。過後把編碼置入在那行字以後。
 |
| Step 3: Adding Leaderboard Unit |
Step 4: / 步驟四: Adding Large Rectangle Unit / 加入Large Rectangle單位
Find "post-footer-line-2" in HTML template editor by using "Ctrl+F" and look for </b:includable> element nearby to insert the ads code provided above it.
在HTML編輯框格裡,運用"Ctrl+F"來尋找"post-footer-line-2"。然後尋找附近的</b:includable>元素以便將廣告編碼置入</b:includable>之上。
 |
| Step 4.1: Find the line "post-footer-line-2" using "Ctrl+F" |
 |
| Step 4.2: Look for </b:includable> & Insert the ads code. |
Step 5: / 步驟五: Adding Skyscrapper Unit / 加入Skyscrapper單位
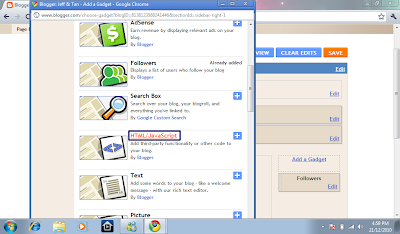
It's easier to add Skyscrapper compared to the other two. Click on the "Page Elements" in "Design". Click on the "Add a Gadget", then "HTML/Java Script". After you've clicked on "HTML/Java Script", paste the ads code for Skyscrapper unit in the content area. You can give whatever name to the gadget name in the title column. =)
比起其他兩個,Skyscrapper單位是比較容易添加。在"Design"界面裡按"Page Elements",然後再按"Add a Gadget"。過後尋找"HTML/Java Script"來添加。按了"HTML/Java Script",把所提供的編碼置入內容框格內。你可以在題目框格內添加任何名字於那個廣告編碼。=)
 |
| Step 5.1: Go to Page Elements and adding a gadget |
 |
| Step 5.2: Click on HTML/Java Script |
 |
| Step 5.3: Adding the ads code for Skyscrapper |
And that's it. It's done! ^^ You can check out your blog for the advertisements unit placement. If there are advertisements available at the moment, it will appear in your blog, or else, the area will only show Nuffnang Logo.
就這樣完成啦!^^ 你可以立刻查看你部落格裡廣告的位置。如果目前有任何廣告分配於你,你部落格裡的廣告單位才會出現該廣告。不然,那些位置只會顯示Nuffnang標誌。
Signed off by,
Jeffrey